
Click on the language you wish to continue with HINDI, GUJARATI
Manual contains information about various APP screens and essential functionalities to smoothen your experience while using our software
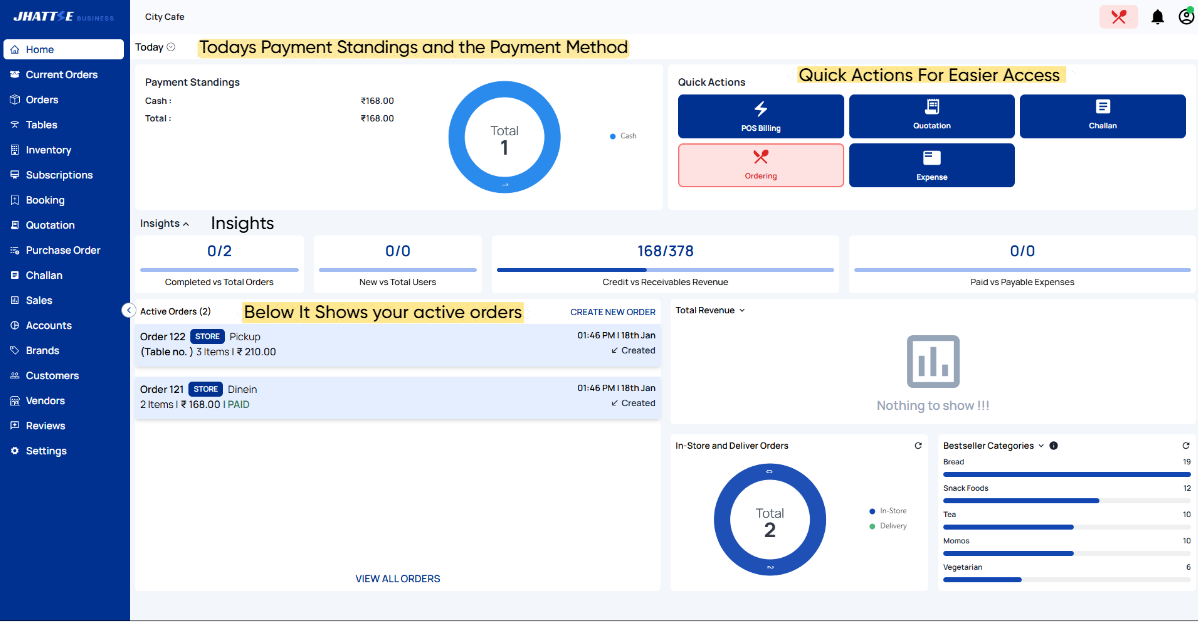
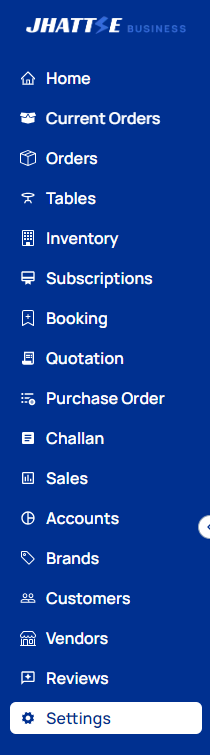
1. Home/Dashboard
In Dashboard you can check how many total orders, completed order, the payment method they used cash/upi,any
Then you got some QUICK ACTIONS to make it easier to access options. P.O.S Billing, Quotation, Challan, Ordering and Expenses
Insights show you a quick look at Order Status, New/Total Customers, Credit/Recievables Revenue and Expense Status
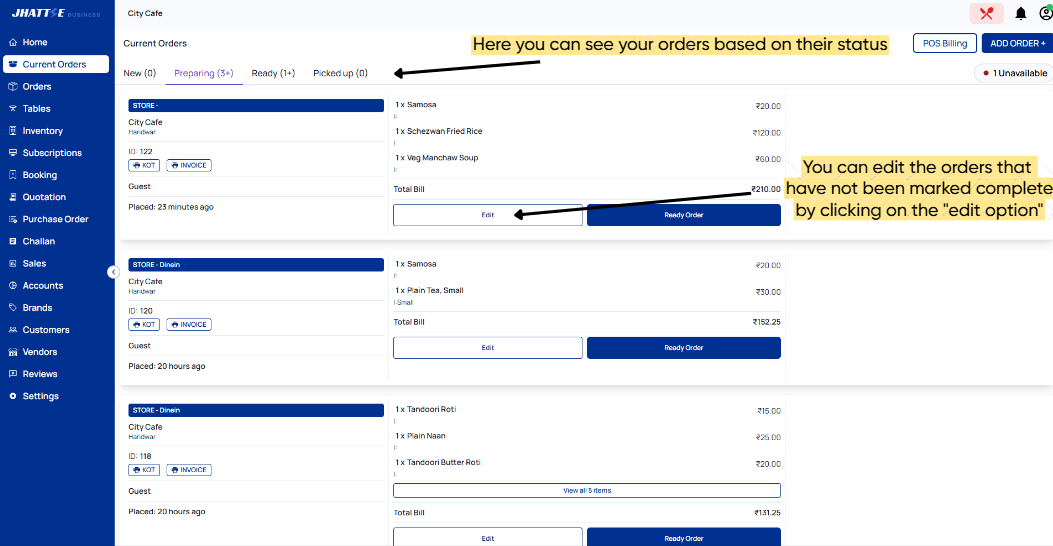
2. CURRENT ORDERS
It shows you New/Active and Orders that have been in various stages [New, Processing, Pickup, Dispatched] up.
You can also edit non completed orders in case you want to make any change
3. ORDERS
You can edit the type of order you get to see by multiple filter options (Order Status,Source,Payment Status and Pickup/Delivery
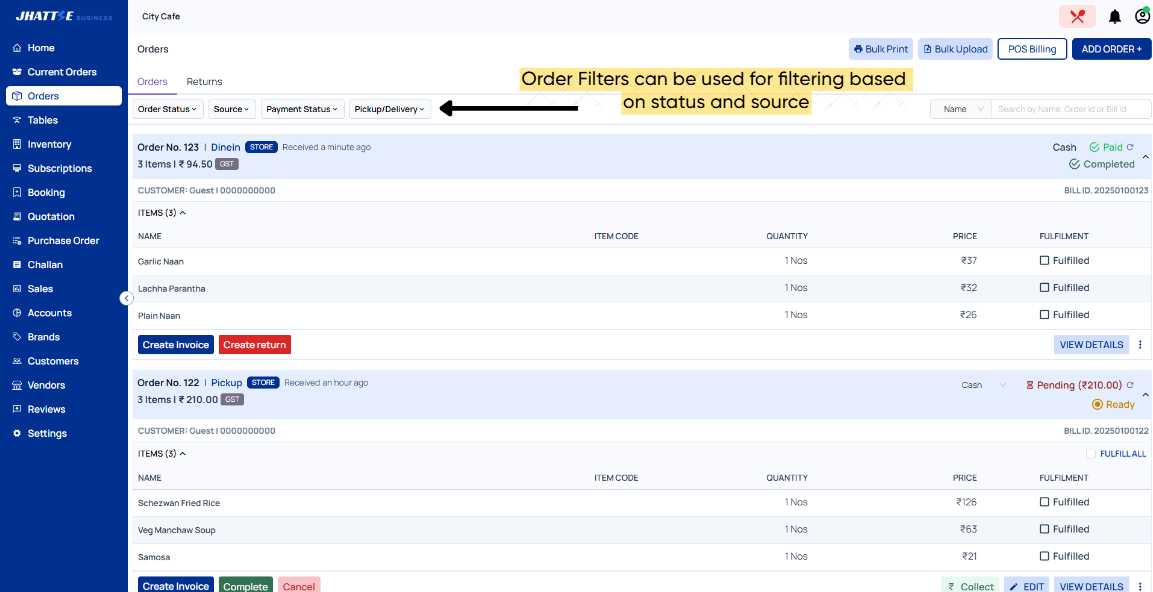
And if you have Return Enabled it will show a diffrent section for them
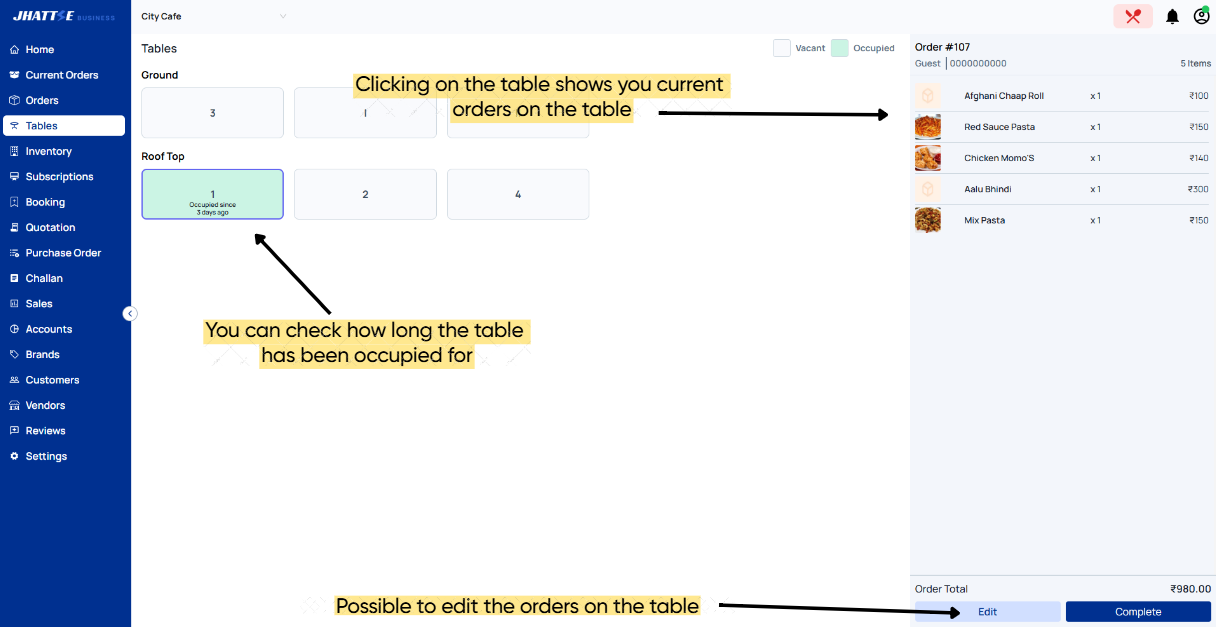
4. TABLES
Tables shows the status of all tables, How long its been occupied for, the order of the table and can edit the order for any changes
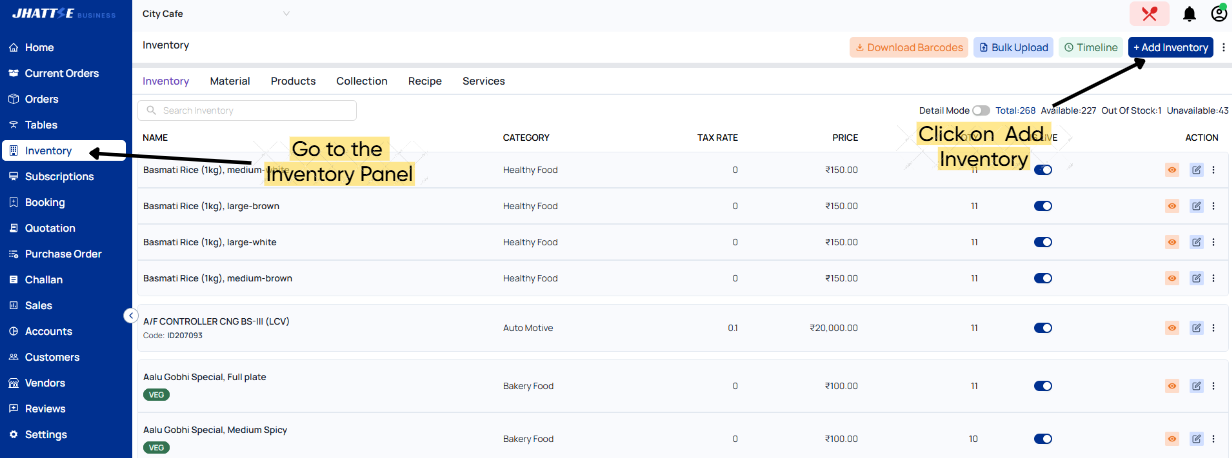
5. INVENTORY
(5.1) How To Add an Item In Inventory
- Go to the Inventory Panel
- Click on the Add Inventory Button on the top right
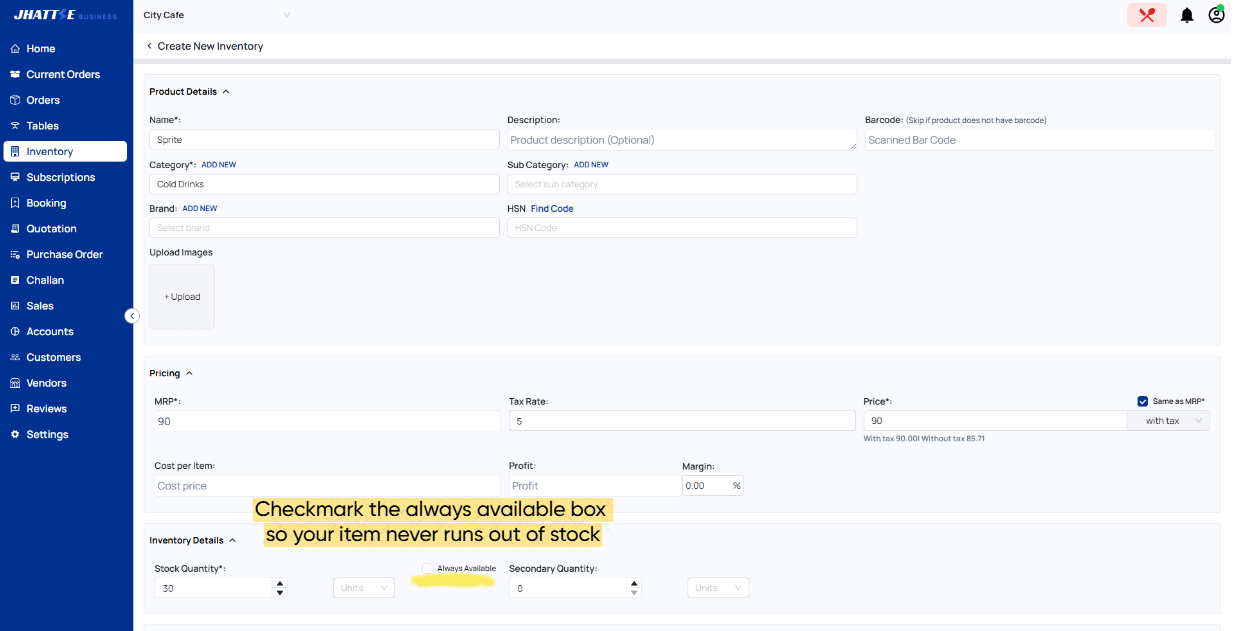
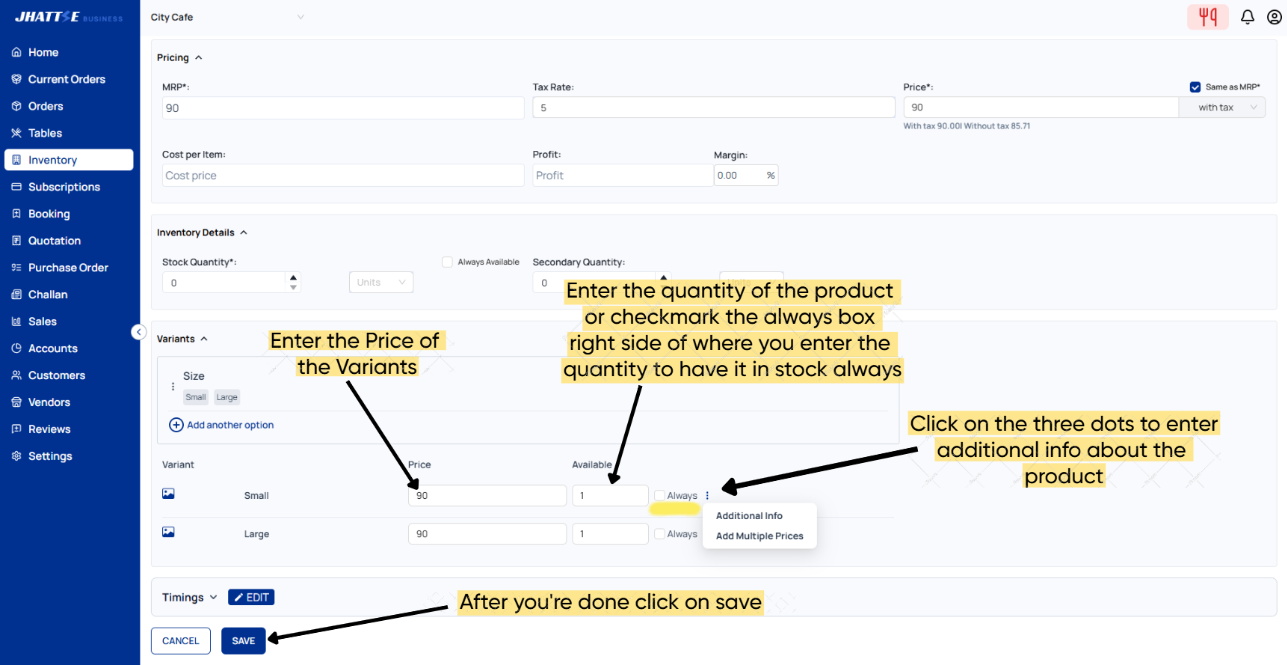
- Fill Out the Information about the Product (You can check mark the Always Available Option so the item never runs out of stock or put exact quantity.
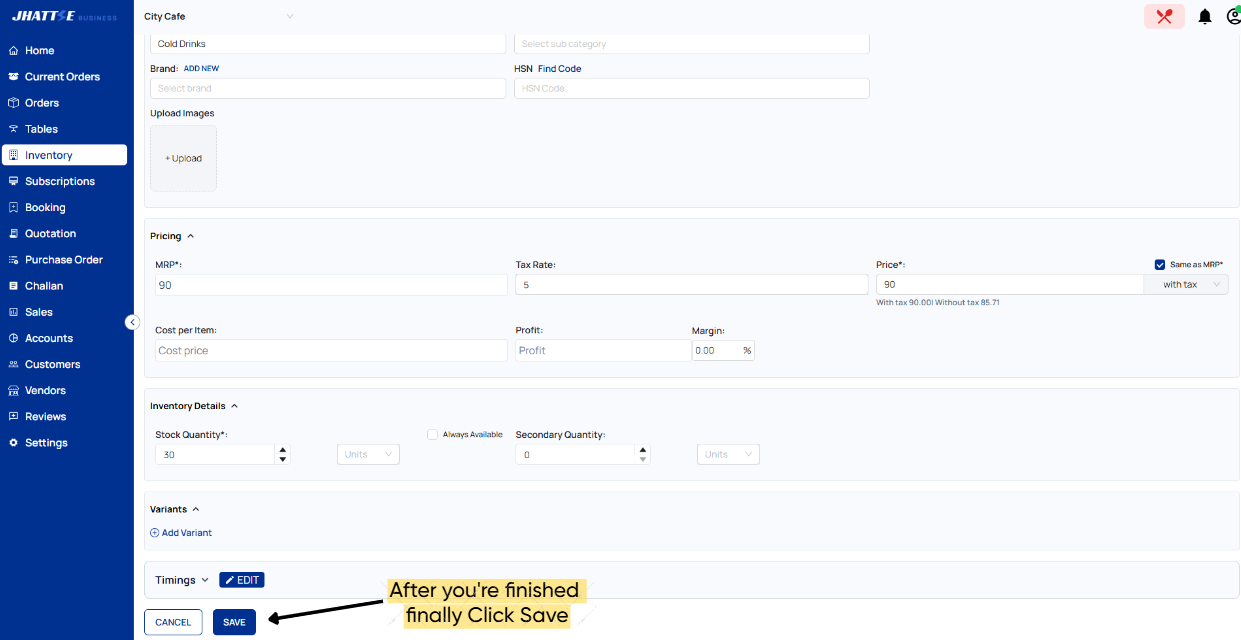
- Scroll down a little
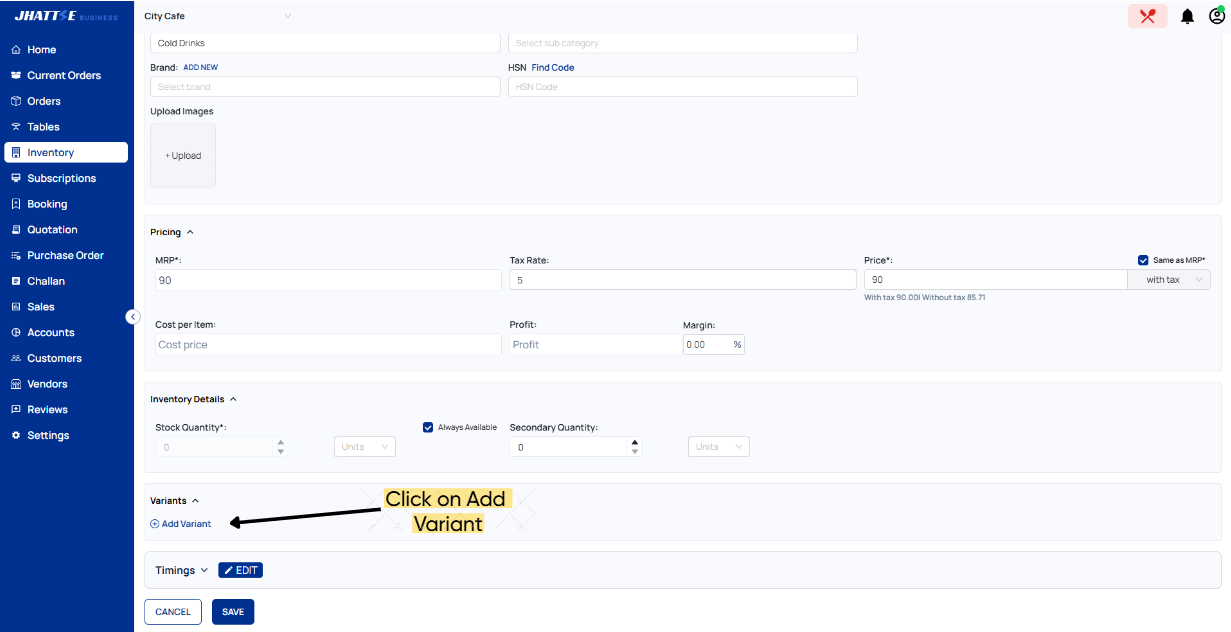
- You can Add a Variant if the item has multiple variants eg. Large Grape Juice, Small Grape Juice, Half Momo, Full Momo and so on.
- Then Click on Save
Now the Product will be shown in your Inventory
(5.2) How to Add Variants
- Click on the Add Variant Option while adding a product to your Inventory
- Enter the Group type eg. Size, Colour, Flavour or some other category.
- Now Enter the Variant type eg. Small, Large, Half, Full etc. and Click Okay
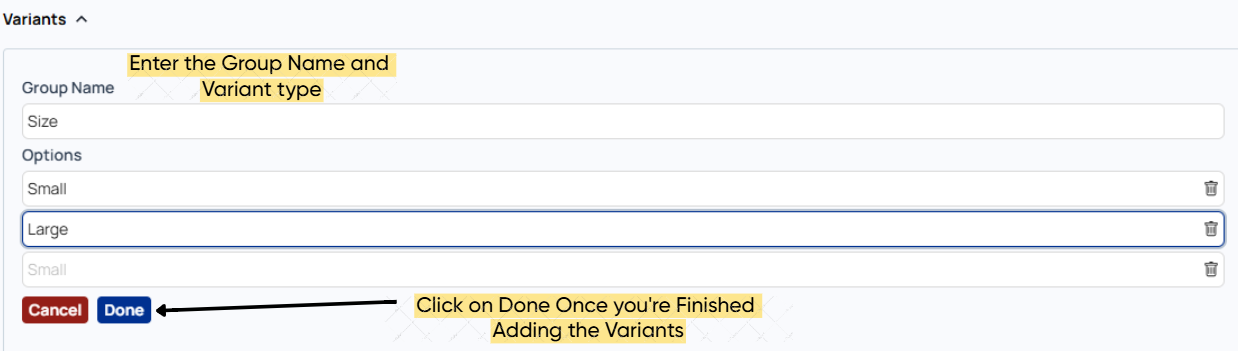
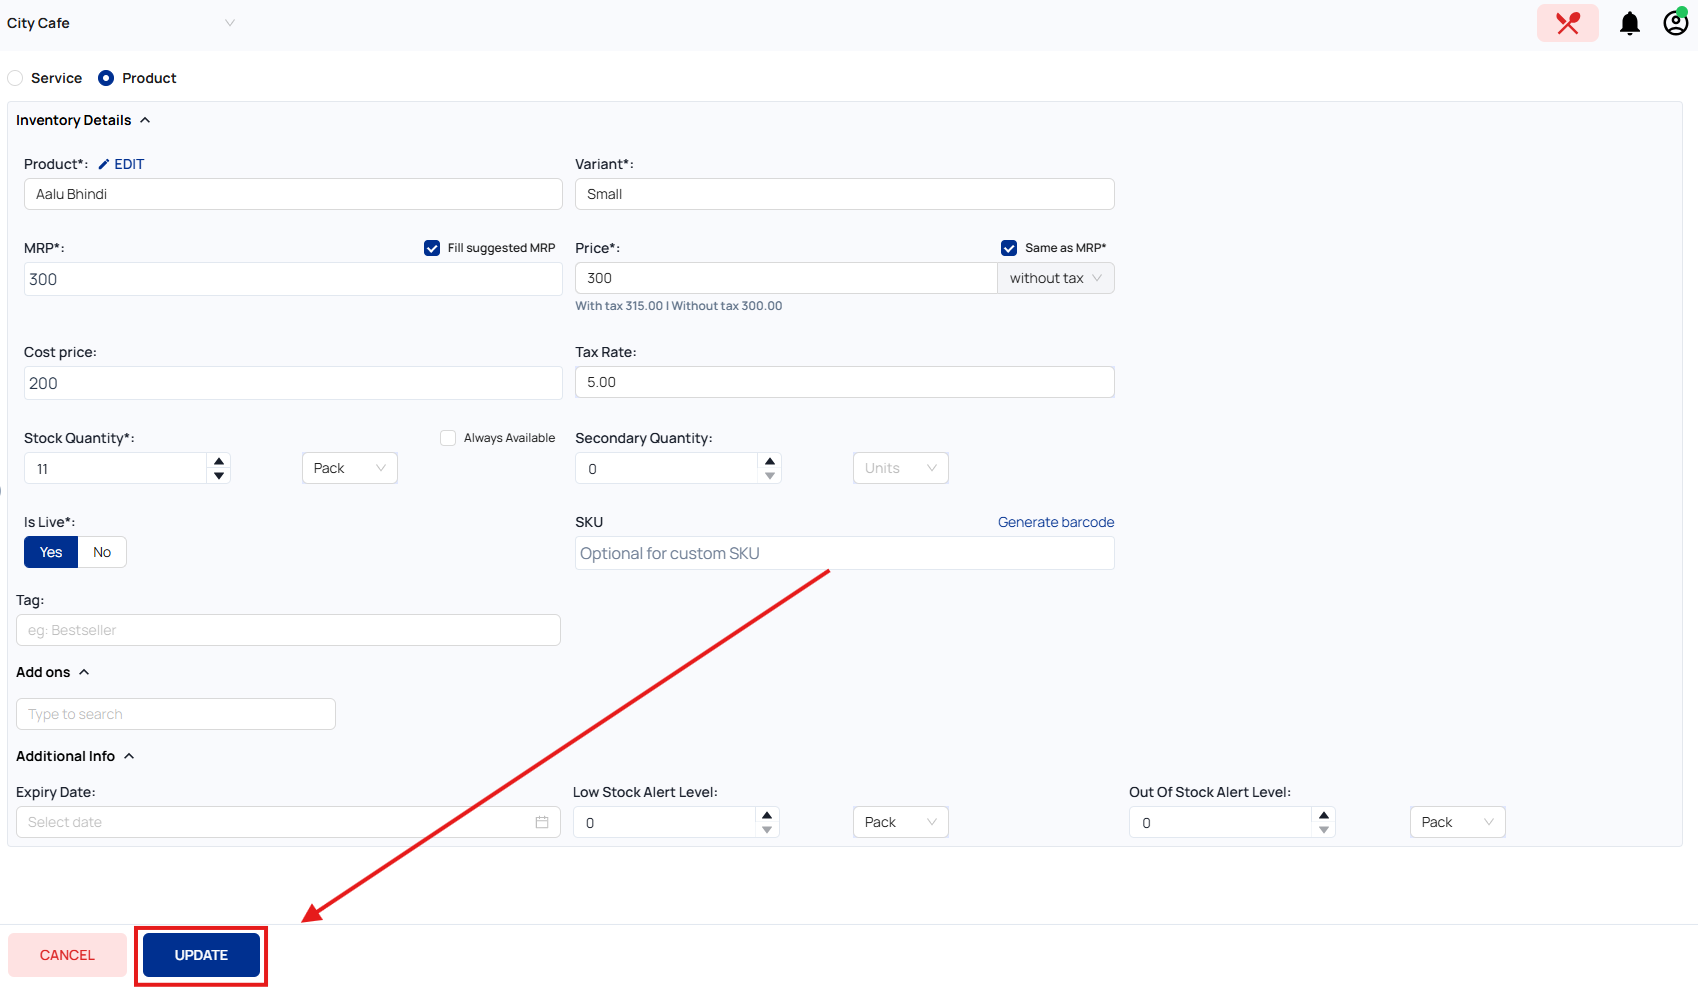
- The Variants will be added. Select the newly added variants price, Quantity you have available(checkmark the always option to make it always available)
- Click on the three dots ⫶ > Additional info to enter more information about the variant type and click update
- Now Lastly Click on Save
Now the Variants will be added to your item
In Inventory it shows the items you have,Their Quantity,Price,Tax Rate, and if it's Live (If live is turned blue it means the customer can see the product and if its grey/white the product wont be shown in your store page)
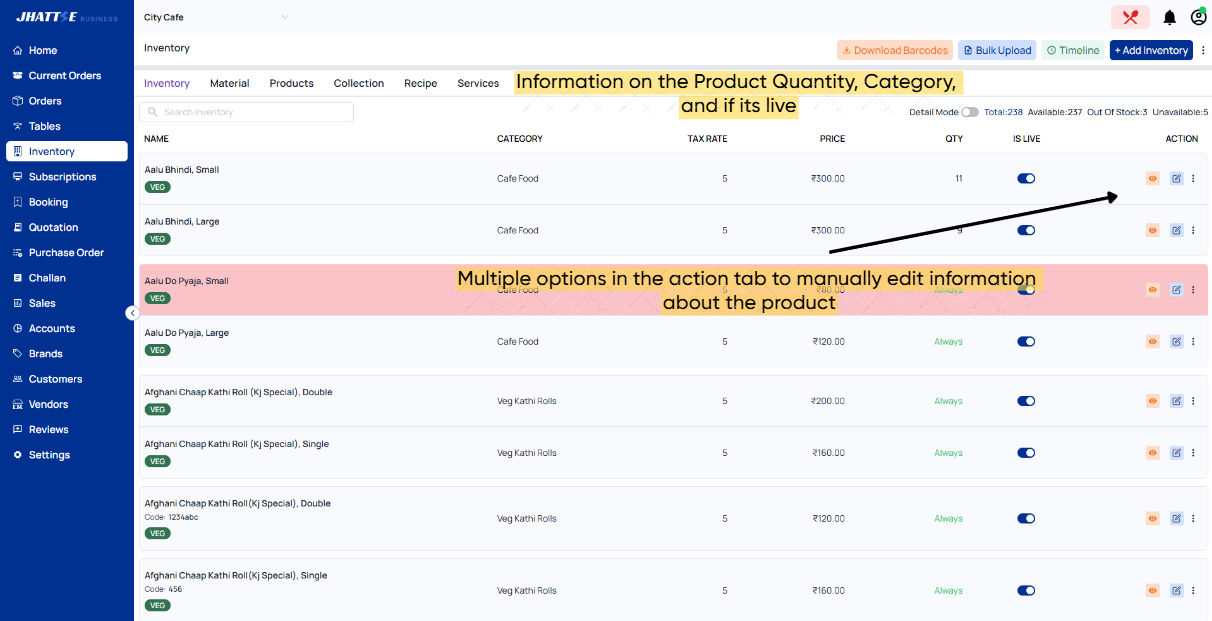
(5.4) ACTION
Update Currenly added Inventory item
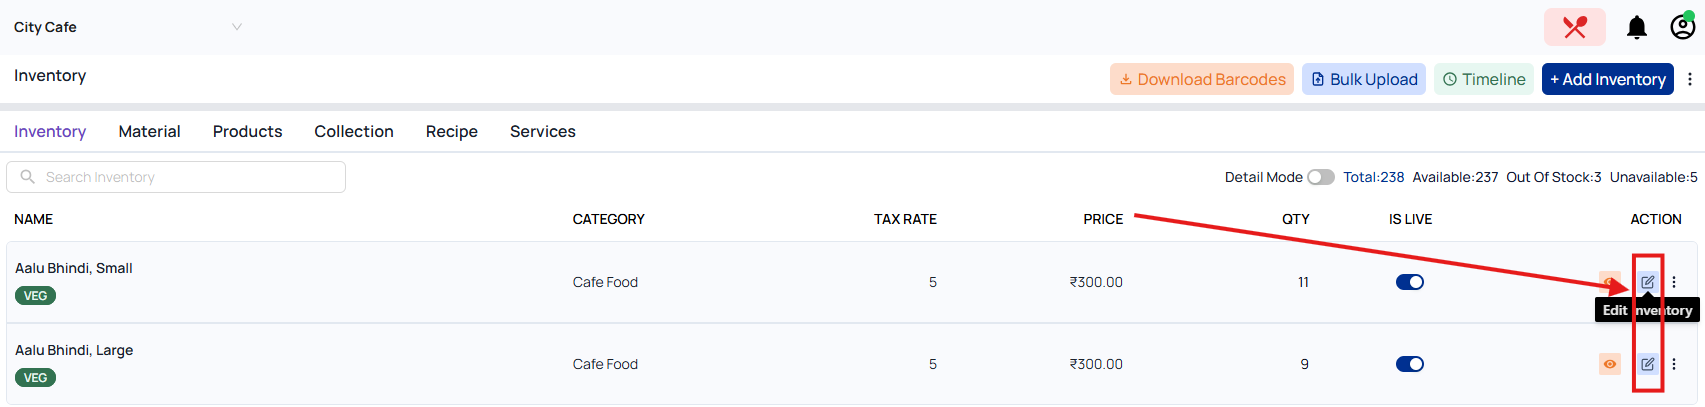
Click on the blue edit inventory option at the right end line of the product
and edit price, name, product category and click update on the bottom to save the changes
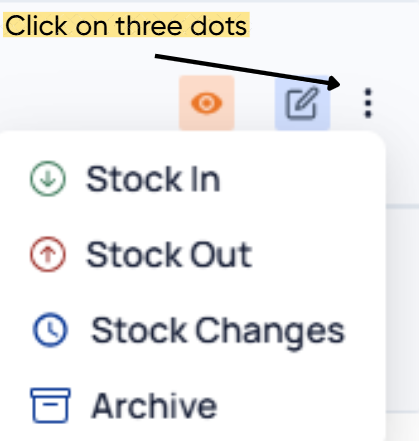
In actions you can see the product barcode,edit the selected item and if you click on the three dots you got 4 options Stock in,Stock out,Stock changes and Archive
Stock In - Manually add the items to your stock.
Stock Out - Manually deduct the items from your stock.
Stock Changes -It shows all the stick change or inventory movement in your stocks.
Archive - Inventory not actively used items can be archived
E.g : Seasonal Products
(5.4) INVENTORY TIMELINE
It shows date and time of your stock movement and the quantity.
It's also possible to search a specific item and select a time period to check the stock movement of that item during that time frame
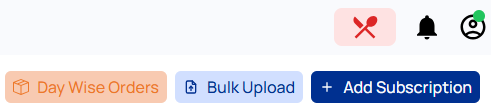
6. SUBSCRIPTION
In subscriptions you can add customers that have routine orders. Like Office tea, Lunches Orders can be Daily/Weekly/Monthly same goes for the billing period.
(6.1) HOW TO ADD A SUBSCRIPTION
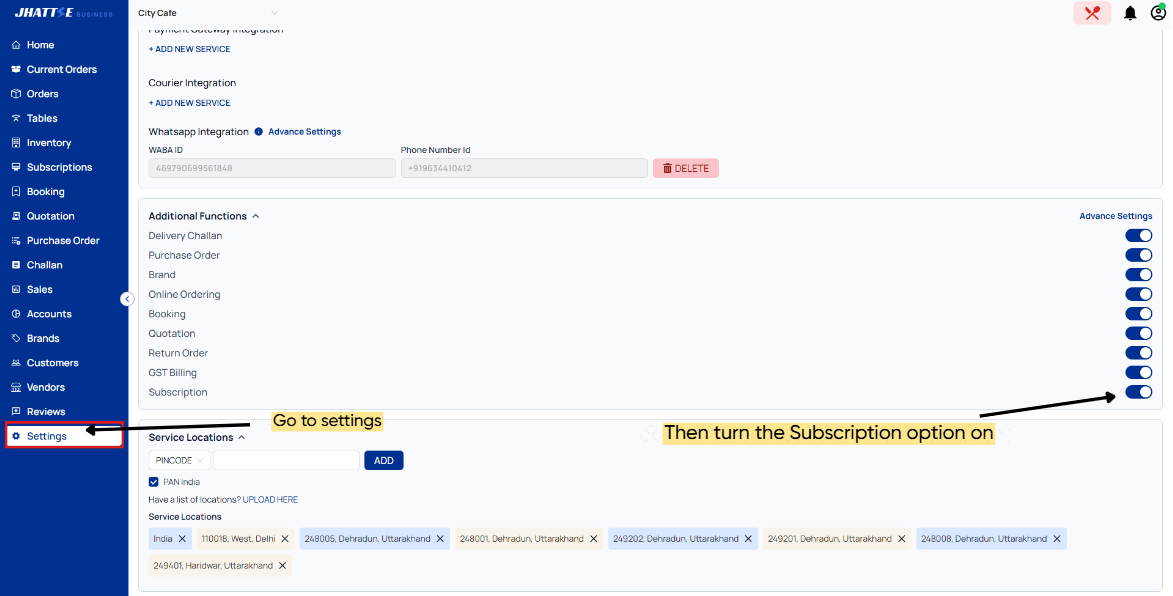
To add a subscription you first need to turn on the Subscription option in
Settings>Additional Functions
- Go to settings
- Scroll down until you find "Additional Functions" option
- Then turn on the Subscription option (it will show blue if turned on and Grey/White if turned off)
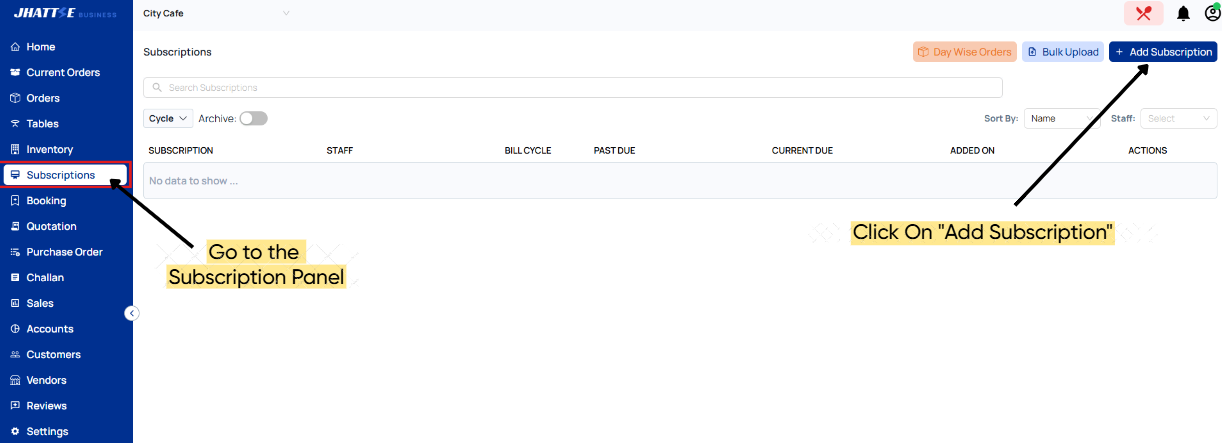
(6.2) Adding a Subscription
- First go to Subscriptions panel
- Click on Add Subscription Top right in Subscriptions panel
- Now enter the customer details, Shipping address, Billing address
- Add the items and their quantity. Then click on Add
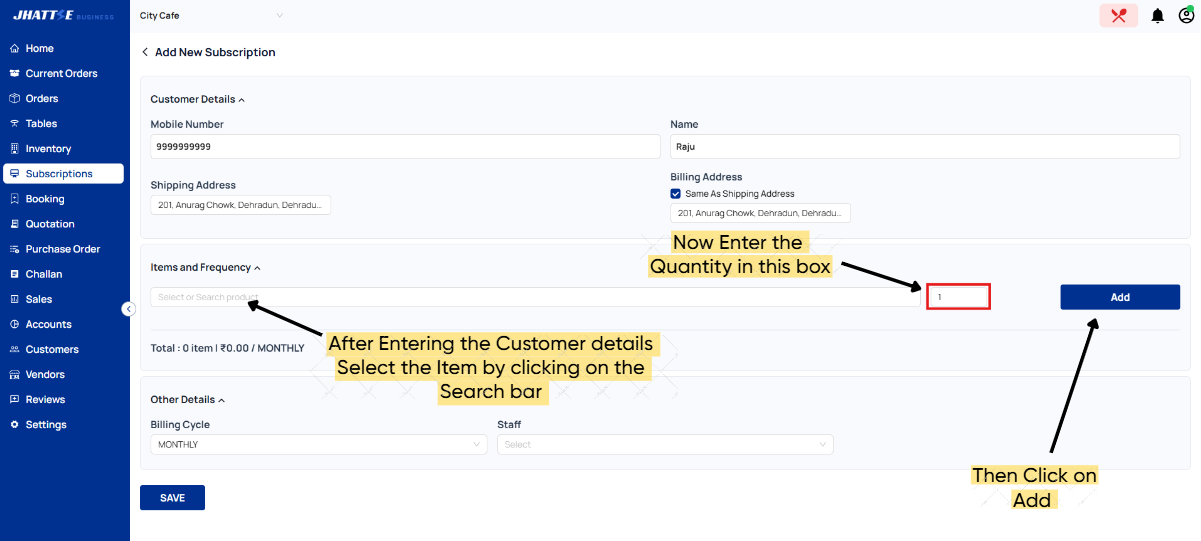
- Now you can select how often you want to send the products from the cycle option in front of the product
- Now comes the billing cycle /How often you want to send the bill
- After that select the staff you want to assign the subscription to (Optional)
- Then Finally click save
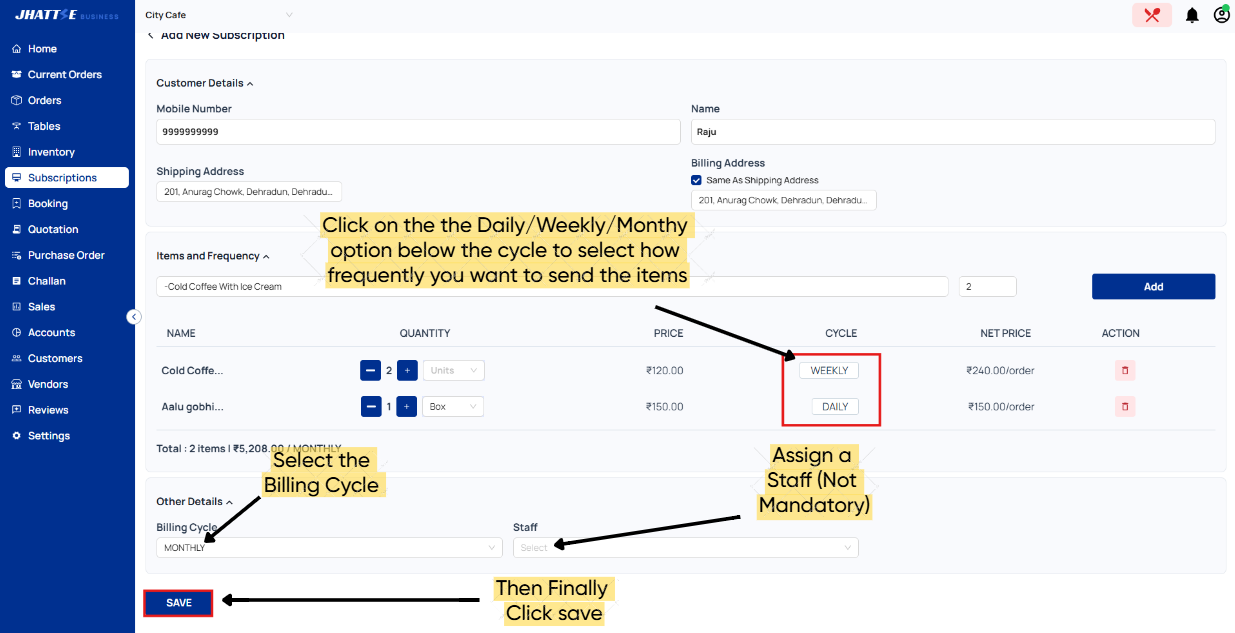
The Saved Subscription will now be shown in your Subscription panel
(6.3) Action
Go to Subscription panel click on the three dots in end line of the customer's Subscription.
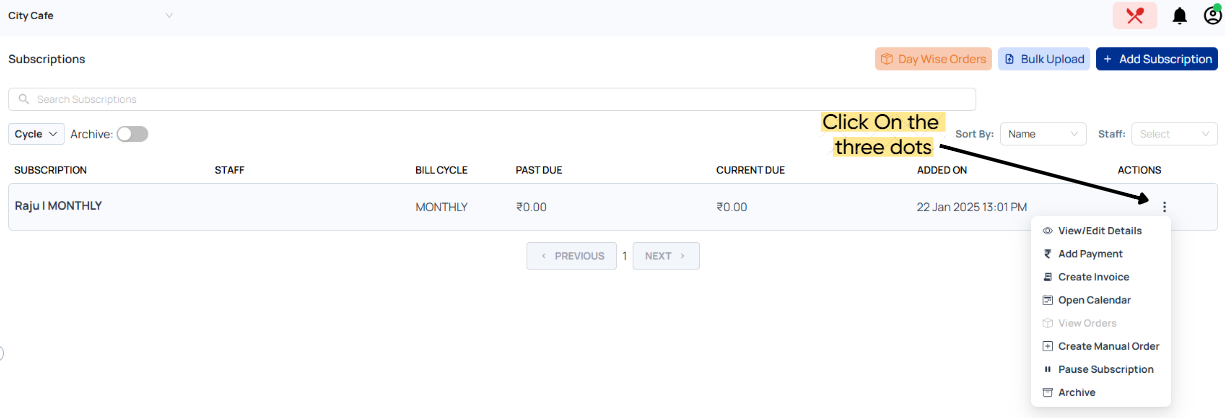
Here you can add payment, create an invoice, open calendar (By opening the calendar you check what days the customer did/didn't order) view/edit details to edit the subscriptions, view orders to check the subscription orders, create manual order to manually create the order of the subscripton you choose, pause subscription to pause the subscription, archive to remove the subscription from the subscription menu
7. SALES
In sales you can check the number of orders you've completed, quantity of products you've sold, sales made and profit
If you want to check Profit/Loss, order count, the number of product sold/volume and sales on a specific product or product category.Click on product or product category and click on product/product category you want to check the information about and click on :

You can also filter the date period and check the sales in a Hourly/Daily/Week/Monthly wise order

Just enter the timeframe and select the duration and hit apply now the filter will be applied to your orders, product/product category
8. ACCOUNTS
In accounts you can add reord of your expenses, sales, purchases and fund transfers. There are 2 sections in accounts record and summary
- Summary - It shows the Store name, total, payment, current recievables, total recievables, current payables and outstanding
- Records - Here you can see records of your sales, expenses, purchases and fund transfer.
(8.1) Check your Settled/Unsettled Payables or Receivables
- You can check your settled/unsettled payables or receivables through **Account>Records

- You can narrow it down by the party and the timeline.
- Click on "All"
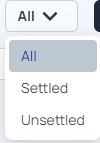 and select if you want to see settled or unsettled accounts
 - And click apply.
- Now the records will be updated per the filter you chose
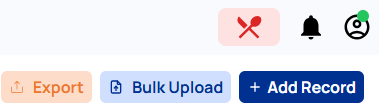
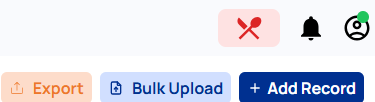
(8.2) Downloading GSTR-1 Report
- Go to accounts panel
- Click on Export top right in accounts panel
- Select the timeline and type of report
- Now click download
Now your file will be downloaded sucessfully
9. CUSTOMERS
If you've taken name, email or number of your customer when making invoices it'll show you the amount worth of goods they've purchased from you and total number of transactions they've made
To check this by filtering follow the following steps
- Go to Customers panel
- On top right in Customers you'll see a searchbar

-
Click on the down arrow besides name and select if you wish to search by email, name or contact info
-
Now you'll see the all the transactions that customer has made, last transaction they've made and total amount
-
If you wish to see a specific transaction from the customer click on View All Transactions
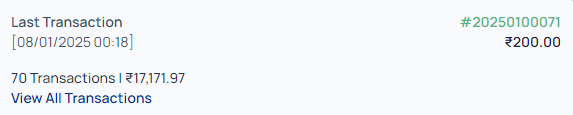
- Now it'll show all the transactions they've made with Date, Time and Amount

- If you want to see the KOT/Invoice click on the Bill ID
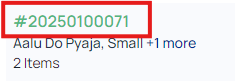
- It'll now open all the details about the order
10. VENDORS
You can add a Vendor by searching for their Name, GST Number or Unique ID
if they already have Store on Jhattse.
- Go to Vendors panel

- Click on the down arrow beside name
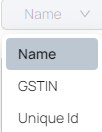
- Select the desired method
- Now simply enter the details and add the vendor
(10.1) Manually Add a Vendor that's not already added on Jhattse
- Go to Vendors panel
- Top right in Vendors click on
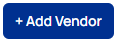
- Now enter all the mandatory details and click save
Now you've successfully added a Vendor thats not already on Jhattse.
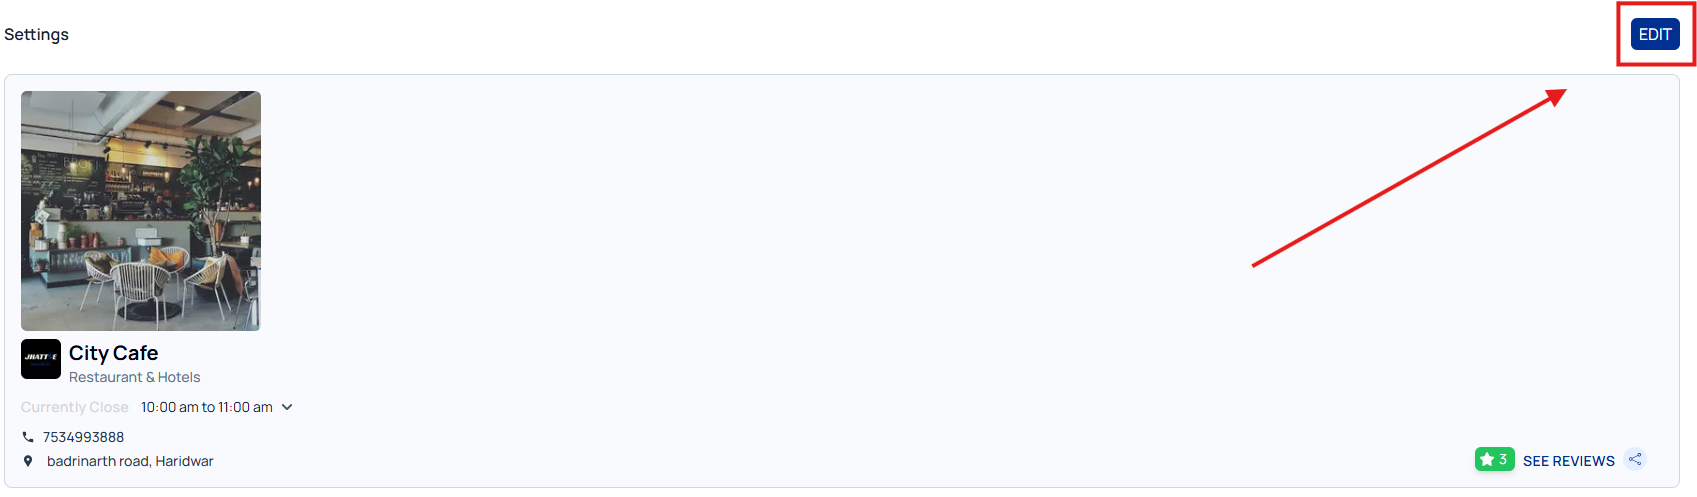
11. SETTINGS
(11.1) Store Settings
Here you can update the store information you made while creating the store and add a logo/store image, etc.
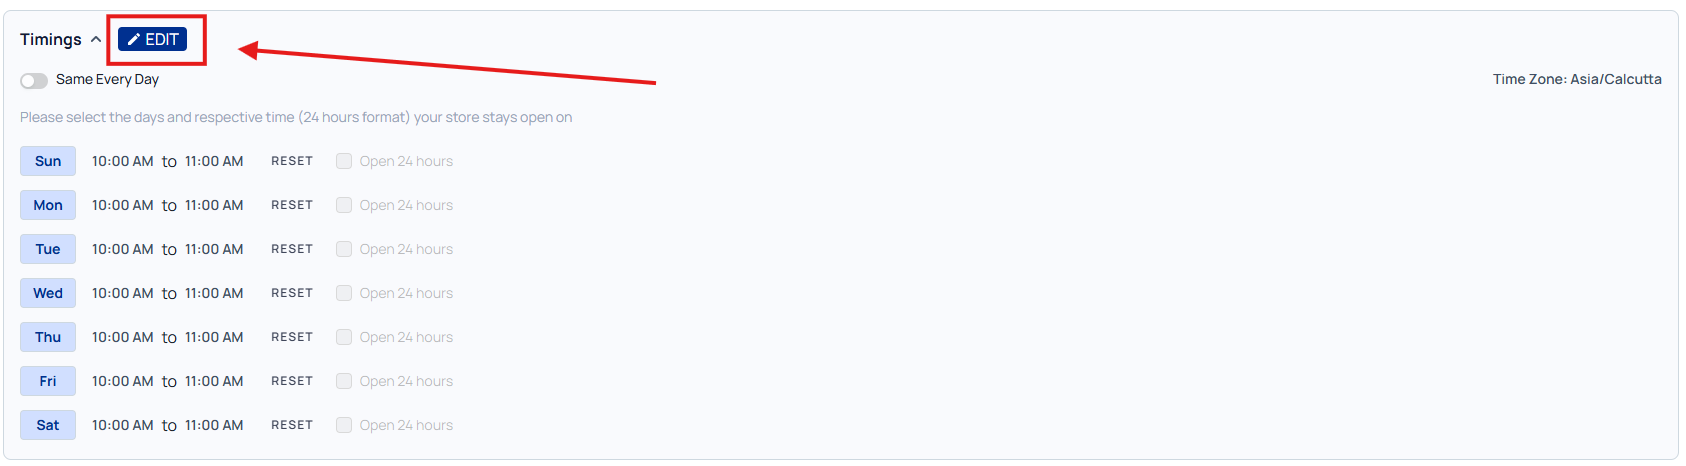
(11.2) Store Timings
Here you can enter the store open/close timings. First you need to click on edit then enter the timings and click save. (The save option will appear in place of edit when you click on edit)
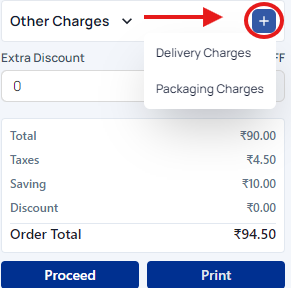
(11.3) Add Charges
Here you can add Packaging, Delivery Charges and Extra Charges and save it.

You can add those charges when you’re making an order. Hover on the “+” icon and select the type of charge now the charges will be applied
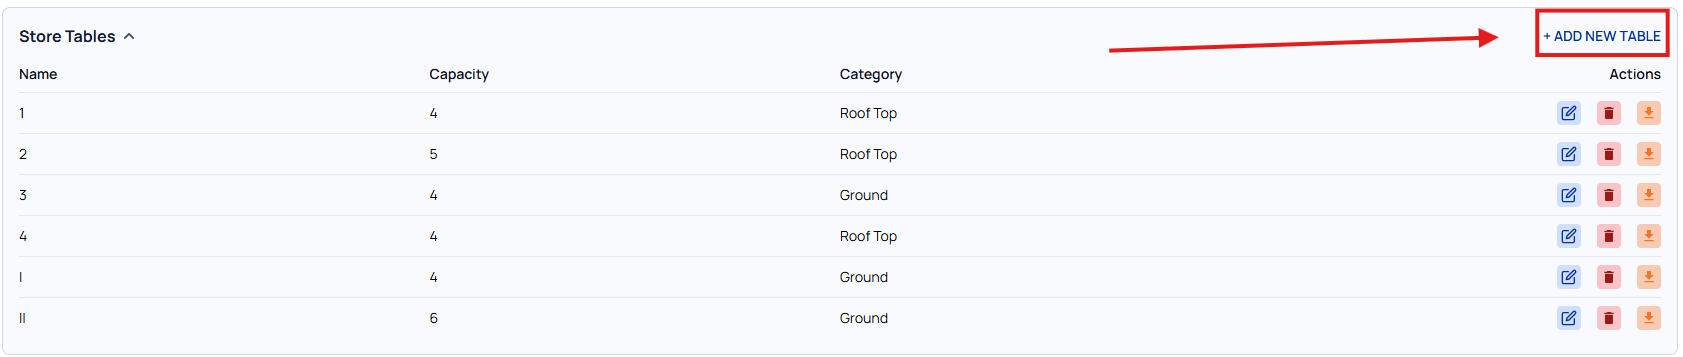
(11.4) Tables
Here you can see all the tables you’ve made. Edit the tables/delete them or add a new table by clicking on the ADD NEW TABLE
(11.5) Payment Methods
In this you can add your upi/bank account that you’ll receive your payments on
(11.6) Invoice Settings
- First click on EDIT in the far right corner

Now select the type of Invoice ID Format you’d like to choose from the given two.
-
Invoice Start Number The number your first invoice starts from
-
Invoice Reset Period You can select how often your Invoice resets. E.g Monthly,Yearly and Never
Advance Invoice Settings Here you can edit whether you want to hide your Store Logo*, Discount, Savings, Round Off, Tax Breakdown and Print Size
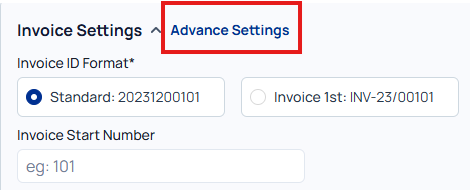
It’ll Show BLUE if turned on and WHITE/GREY if turned off
Now after you’ve selected the settings you wish. Save the settings by clicking on save. (Save option will be show in place of Edit once you start editing)
(11.7) Billing Template
When you make an order. There is GST and Non-GST billing they both have different Invoice Number. You can choose different templates for both billing types. You’ve got a couple choices depending on the type of business you have.You can preview the template by clicking on preview on the far right
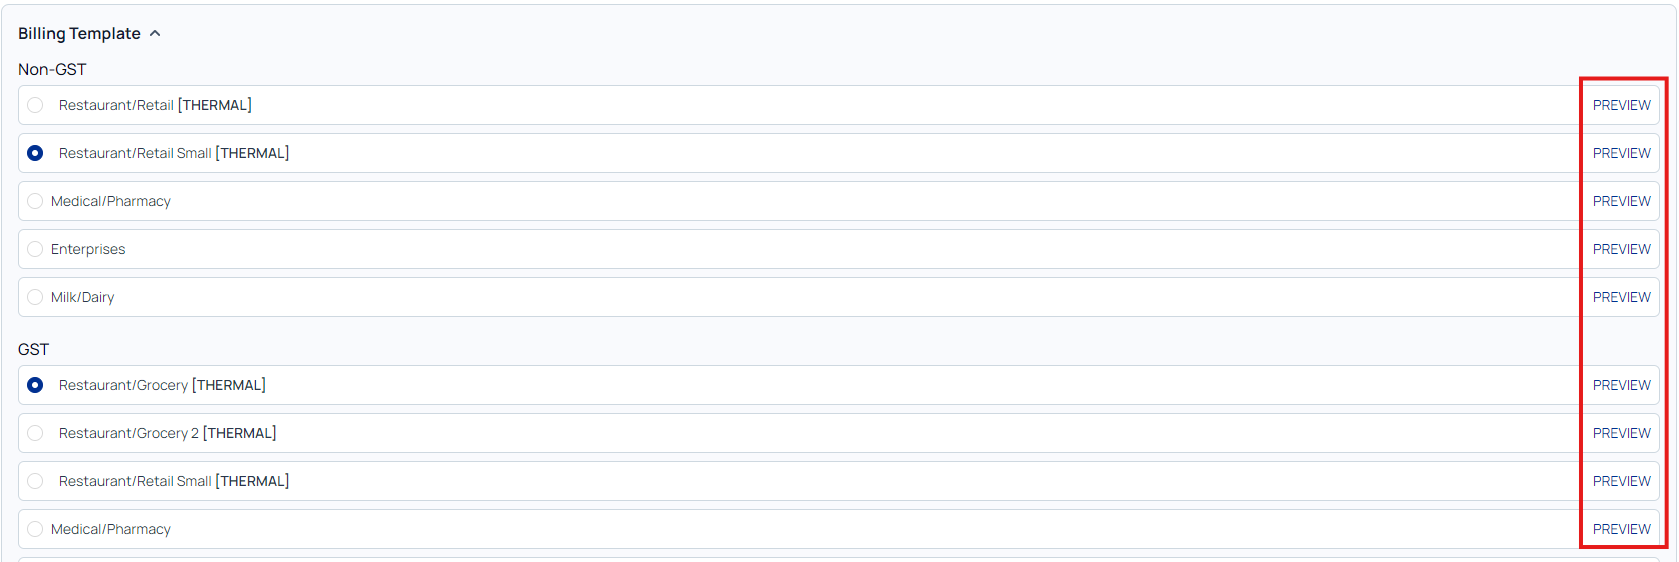
It’ll show BLUE before the template type that's currently chosen
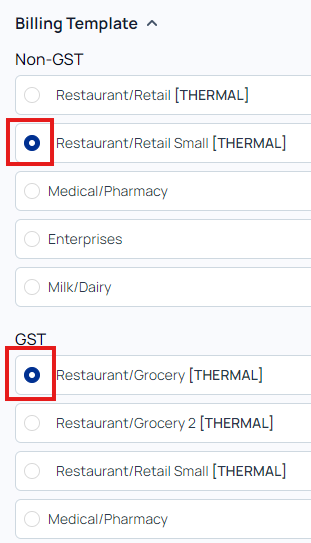
Your Template Changes will be Automatically Saved
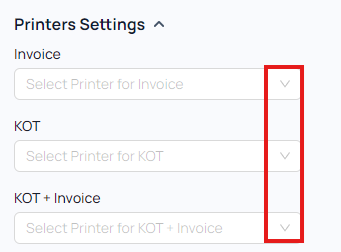
(11.8) Printer Settings (Exclusive to our desktop app)
Here you can select your printer that you want to Print the Invoice & Kot with. Just click on the down arrow and select your printer
(11.9) Integrations
In this you can connect your business to Marketplace,Ecommerce,Payment Gateway,Courier and Whatsapp Integration.
Once you’ve added your Whatsapp Integration you can select the message template the customer gets when they place an order, when order is due and once the order has been completed. Click on Advance Settings in front of Whatsapp Integration to select the Template.

(11.10) Additional Functions
Here you’ve got some Functions like Delivery Challan, Purchase Order, Brand, Online Ordering, Booking, Quotation, Return Order, GST Billing and Subscription
Delivery Challan - A Delivery Challan is a document used in the delivery of goods, typically issued by a seller or supplier when goods are dispatched to a customer or recipient. It serves as proof of the shipment or delivery of items but is not a formal invoice.
Purchase Order - A Purchase Order (PO) is a formal document issued by a buyer to a seller, outlining the goods or services the buyer intends to purchase. It serves as a legal agreement between both parties and typically includes the following details.
Brand - The Brand function allows businesses to manage and differentiate various brands or product lines within the system.
Online Ordering - You can choose whether you want to receive Online Orders from our site
Booking - If turned on you can do online Booking of Hotels through our Software
Quotation - a Quotation is a document that outlines the estimated cost of goods or services provided to a customer before the final sale or agreement. It typically includes details like item descriptions, quantities, prices, taxes, and any applicable terms and conditions. The quotation serves as a proposal or offer, and it helps customers understand the expected cost before committing to the purchase.
Return Order - You can create a Return if the customer wants to return their purchase
GST Billing - If your GST Billing is turned on we’ll create different billing depending on if the product you're selling has GST or not
Subscription - A Subscription refers to a recurring payment arrangement where a customer pays for access to a service or product on a regular basis, such as daily, weekly and monthly.
If turned on Delivery Challan, Purchase Order, Brand, Booking, Quotation or Subscription. You’ll get all these enabled options available to you on the left panel as shown below
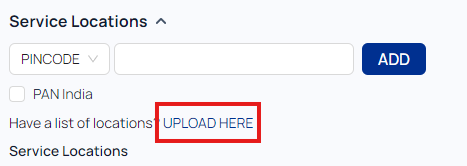
(11.11) Service Location
Here you can enter the locations you’re available at
**How to enter multiple entries of service location at once **
- First click on Upload Here
- Click on Download template. It’ll download all the service locations already entered (If any)
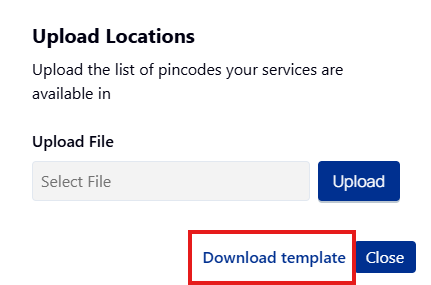
- Now fill out the form and save it
- Now go back to upload location
- Select the file and click upload
Now the service locations will be uploaded and shown below your service location section
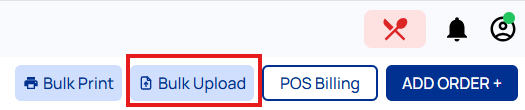
12. Bulk Upload
You can bulk upload your Orders that were not done through our software, Inventory items, Subscription and Expenses, Fund Transfer, Sales and Purchases in ACCOUNTS Panel
(12.1) Bulk Upload Orders
- Go to the Orders panel. Click on the Bulk Upload on the top right
- Click on Download Template

- Now fill out the details in the downloaded template
- Select the file in
- Now go back to bulk upload and select the file and start upload
After the upload is finished your Orders will be added to your order list
(12.2) Bulk Upload Inventory
Go to Inventory Panel. Click on Bulk Upload in the top right

- Now Click on Download Inventory

- Fill out the Template (You’ll have your already added Inventory items in the downloaded Template don't change the item id of the items already added in your Inventory and leave the Item id section blank for the new items you’re adding through bulk upload)
- Go back to where you downloaded the Template from and select the file and hit Upload
Now your new items will be added to your inventory
(12.3) Bulk Upload Subscription
- Go to the Subscription Panel. Click on Bulk upload in the top right
- Download the Template

-
Now Enter the Details and Go back to subscription panel where you have downloaded the template from
-
Select the file and Upload
Now the new Subscriptions will be shown in your Subscription panel
(12.4) Bulk Upload Expense, Fund Transfer, Sales and Purchases
- Go to Accounts panel and click on bulk upload on the top right
- Click on Download Template
- Fill out the Template and go back to where you downloaded the Template from
- Select the file and finally Upload
Your Expense, Fund Transfer, Sales, and Purchases will be shown in your account panel
13. Download Sales and GSTR-1 Report
(13.1) Download Sales
- Go to the Sales panel and click on Export

- Select the Timeline and Type of Report

-Then Click Download
Now your Sales Report will be downloaded
(13.2) Download GSTR-1 Report
- Go to accounts
- Click on export on top right
- Now Select the Timeline and Type of Report and Click on Download
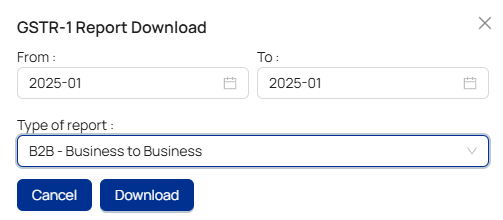
Now your GSTR-1 Report will be downloaded